


How To Use A Stud Finder


Exposed electrical work is an eye sore. Protruding from walls and improperly secured wire work worsens the appearance. In many applications, surface mounting conduit, boxes, and wire mold is the most practical installation method. Due to this, most home/business owners would advocate hiding as many cables as possible. Not only do hidden wires create a clean and sleek look, but they also may avoid a potential hazard in surface mounted wire-mold/conduit. It is essential that a professional understands how to run wiring through walls to provide the best installation possible. To achieve this, a stud finder is required.
Table of Contents
- Why Locating Studs are Important
- Using a Stud Finder
The Importance of Correctly Locating Studs With A Stud Finder
When examining a wall where you will be running wires, it is important to check both sides of the wall. When doing this, keep in mind the location of the wall in comparison to the building. If there are water faucets, this could indicate potential water lines that may lie within the walls. The majority of wall studs are placed 16 to 24 inches apart depending on where the wall may be located within the building. If you’re running cable in the ceiling, figuring out the orientation of the joists will be crucial. So you can determine where to route your wire for your devices etc.
CONS OF USING THE “KNOCK METHOD” VS A STUD FINDER
Sometimes when running wire through walls you can use the knock method, which, unfortunately, is not always accurate. This is where you knock or tap the area gently with your hand. If you hear a hollow or empty sound, that would indicate no stud in that location. If the sound seems muffled with a knock, you’ve hit a stud. Depending on the room’s acoustics, it may be hard to differentiate the sound of a hollow part on the wall or a solid one. Not to mention the lack of efficiency in walking back and forth and knocking on the wall. In situations where someone installing wiring within a wall mistakes a muffled sound for a hollow sound, the result would be less than desirable. Following this mistake, you’d likely have to patch that hole or pay someone to repair it. It saves time as well as the headache of simply using a stud finder.
Using a Stud Finder
There are two distinct types of stud finders that I use. At Rack-A-Tiers, the Stud Ball Magnetic Stud Finder or Franklin ProSensor M10. Each has its benefits when identifying the locations of studs. The Stud Ball being a magnet allows it to be small and compact, making it ideal for tradespersons on the go. On the other hand, The Franklin ProSensor M10 utilizes its sensors to analyze the density in walls allowing you to get pinpoint accuracy. The Franklin ProSensor M10 takes all the pressure out of finding the studs with a knock, as it does all the work for you.
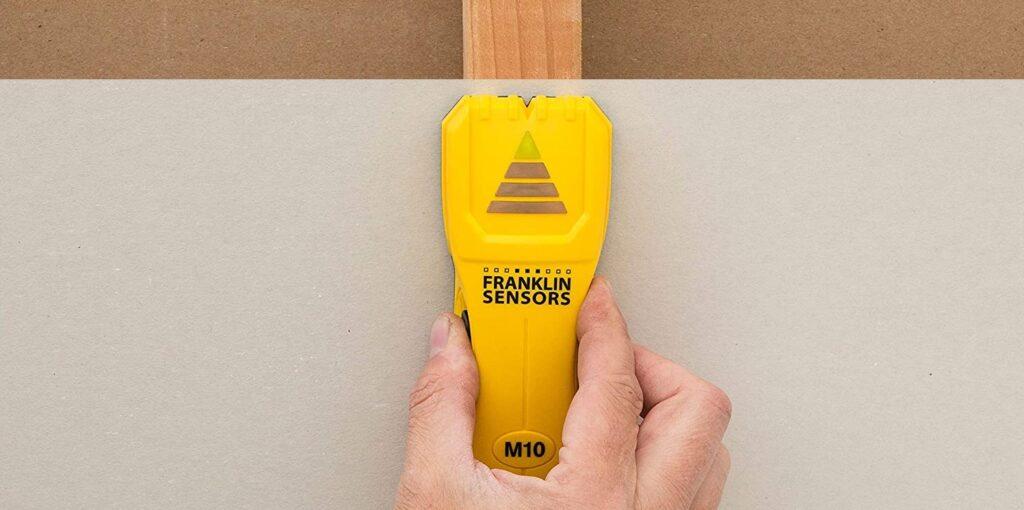
HOW TO USE THE FRANKLIN PROSENSOR M10
- Grab the Franklin ProSensor M10 and use the flat side. Then hold it against the wall applying just enough pressure to allow it as close to the wall as possible without causing damage.
- Hold the side button and move the Franklin ProSensor M10 side to side along the wall. That will allow it enough time to pinpoint the area of the stud.
- The topmost triangular light on the Franklin ProSensor M10 will indicate the center of a stud.
- To ensure that it is the center of the stud, move the Franklin ProSensor slightly to either side. Watch for the lower lights to shift farther down as you move away from the center of the stud.
TIP
REMEMBER, when using the Franklin ProSensor M10, always place it on the wall before holding the button down. To ensure accuracy, be sure it never lifts off the surface of the wall. The Multi-Sense Technology provides better sensor readings resulting in a larger sensing area and a deeper, more accurate stud detection. With the The Franklin ProSensor M10, you can focus on your layout and not stress over unforeseen problems that lay in wait within the walls. This tool is ideal for homeowners looking to hang pictures on the walls or mount their television. It’s inexpensive and saves time. To use the Franklin ProSensor M10, press and hold the side button to quickly begin finding studs. It requires no calibration and boasts a detection depth of 1″.
Buy the Franklin ProSensor M10 from Rack-A-Tiers
THE STUD BALL
Another stud-finding option is the magnetic stud finder, The Stud Ball. This Magnetic Stud Finder has an ergonomic design and can fit inside your pocket or on the side of your fridge. The Stud Ball thrives in buildings that have metal framing as The Stud Ball will stick to the studs. Here is how to use the Stud Ball Magnetic Stud Finder.
- Grab the Stud Ball Magnetic Stud Finder and place it on the area of the wall you are going stud hunting
- In a wide sweeping motion, go back and forth along the wall slowly until The Stud Ball sticks to a spot
- Once the Stud Ball sticks to a spot, move the stud finder vertically upwards or downwards to find other screws along the stud.
What about wood-framed buildings?
Should it come to wood-framed buildings, The Stud Ball is still very effective. The Stud Ball will grab onto the screws that hold up the drywall on the studs. In order to be sure it is a stud, it is good practice to use The Stud Ball and find three nails along the same stud. Many times random material gets stuck in walls during the building process. So to reassure it is not a random metal object, finding multiple screws along the stud will confirm. The drywall screws are often times spaced 6-8 inches apart vertically. Be sure to pay attention when The Stud Ball grips vertically along the wall without a gap between screws could indicate a metal pipe in the wall.
Buy the Stud Ball from Rack-A-Tiers
Finding studs within a wall can be a daunting task. It is important the proper steps get followed to help this process. Using the right tool can be a major difference in the efficiency of the job as well as it’s management of it. Whether it is the Stud Ball or the Franklin ProSensor M10, rest assured knowing you will be ready for any job.

